How To: Take Screenshots of the HTC Droid Incredible in Mac OS X with the Android SDK
For me, the idea of a smartphone with internet access was overkill for a cell phone. Wasn't that what my computer was for? Do I really need immediate access to the web? Must I update my Facebook every hour, from the palm of my hand? Do I need turn-by-turn directions from Google Maps when I have an actual map in my glove box?These are just some of the questions I asked myself.For the longest time, I thought that owning a smartphone was counterproductive to ingenuity, that tackling life's simple problems no longer required sharp thinking, knowledge and experience. All you needed was a pocket-sized mobile device to get answers from, to think for you, to tell you what to do.The only thing I wanted to do with my phone was talk to my family and text everyone else. And my previous two mobile phones, an LG Voyager and Motorola RAZR, did just that. But when Verizon Wireless unleashed the Motorola Droid X in July, I had a change of heart, I had to go check this thing out for myself. Maybe it was time I embraced cellular technology instead of snubbing it. Maybe answers at my fingertips is a good thing.So, I went to the nearest Verizon store and played with the new Droid X, but could not get past how big it was. Then I saw the HTC Droid Incredible and fell in love. I couldn't resist. It was perfect for me.So, after nearly a week of playing with my new HTC Incredible, I had a yearning to take screenshots of my Droid's screen. That's how far I've come in one week! But much to my surprise, it was no easy task, at least for me— a smartphone newbie.There are no applications that can take screenshots of the Android operating system, unless you have a "rooted" phone. And for me, that's above and beyond my degree of expertise (which is basically nil). I did find a lot of websites that gave instructions for an easier option, but they all seemed to be geared at Windows users (I'm a Mac user), and they all required downloading the Android SDK and the Java SE SDK.Now, the Java SE Software Development Kit is for Microsoft Windows, Linux and Solaris operating systems only, despite that half of the how-to articles I looked at claimed to work on Apple computers, too. But eventually, I found some helpful advice, and want to share how I finally got screen grabs from my HTC Incredible.NOTE: I am using a MacBook Pro with Mac OS X 10.6.4 (Snow Leopard) and the HTC Droid Incredible with the Android 2.1 firmware.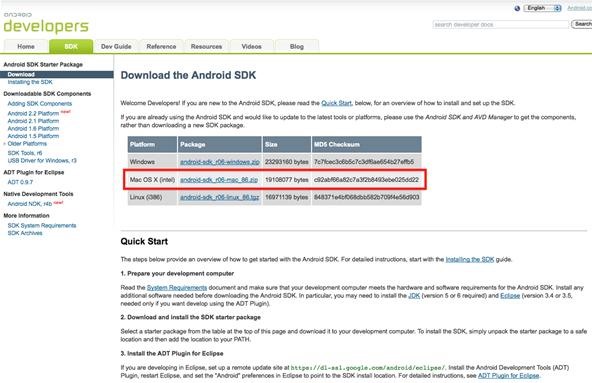
Getting Screenshots from the Droid IncredibleThough these instructions are for a HTC Droid Incredible, it should be a fairly similar process (if not identical) for other Android phones.Step 1 Download the Android SDK for Mac OS XGo the Android Developers website and click on the Android SDK for Mac OS X (Intel) link.Ignore everything else on that page, because I read through it thinking I had to follow the "quick start" directions, but only got more confused. The only thing you need to know is that you need Mac OS X 10.5.8 or later using x86, which basically means any Mac computer with an Intel processor (sorry PowerPCs).A download box will appear. Press OK to download the ZIP file to your computer.Step 2 Un-ZIP the Downloaded FileWhen the download finishes, find the saved file on your computer, which should be named android-sdk_r06-mac_86.zip. If the file hadn't unzipped automatically (mine does), unzip it and wait for the folder to appear nearby, which should be aptly named android-sdk_r06-mac_86.You can delete the ZIP file if you want. Then you can rename the zipped folder to whatever you want, if you so desire. Then move it to a location of you choice, for safe keeping. I simply named mine Android SDK and threw it in my Applications folder.Step 3 Ready the HTC Incredible PhoneYou need to make sure USB Debugging is checked on your Incredible before you can connect it to your computer with the provided USB cable (everyone should have one).NOTE: Some of the screenshots were taken at different times, so the clock's reading may not be in chronological sequence.Make sure your phone is turned on and unlock your screen. Press the "menu" button on your Android device and select the Settings option from the list that appears.Once in Settings pane, navigate down to Applications. Select it, then select the Development option. Make sure USB Debugging is turned on with a green check mark beside it.NOTE: You can also get to your Settings via the Applications shortcut button in the bottom left of your screen.Step 4 Connect the Incredible via USBConnect your HTC Incredible to your Mac computer via the USB cord that came with your phone. The first time you connect to a computer, the Connect To PC box will pop up on your phone with four options to choose from.NOTE: I initially just tried Charge only, but when I proceeded with the following steps, I got an error in Terminal and it didn't work. The second time I tried, I tried Disk drive and it worked. Then every time after that, it worked no matter which of those two settings I chose. It might have just been a small error on my part, or maybe just a little software confusion, but definitely worth mentioning.You may have to play around with your connection settings to get it to work the first time, after that it shouldn't matter.Step 5 Open DDMS in the Android SDK FolderNow that your device is connected to your computer via the USB cable, you need to open up the downloaded Dalvik Debug Monitor Server (DDMS) from the Android SDK folder.Find the Android SDK folder (mine's in Applications), select the tools folder, and then open up the ddms file.As soon as you open up the ddms file, a Terminal window will appear. Ignore it, but leave it opened (Dalvik Debug Monitor will shut down if it's closed).Next, the Dalvik Debug Monitor will launch almost immediately after the Terminal window appears. Make sure your device name is highlighted in the Name column.Step 6 Open Screen Capture in DDMSAfter your device is selected, go the Menu bar and select Device. Then select Screen Capture. Or you can use the Apple keyboard shortcut (^S or Control-S).The Device Screen Capture box will open up and it will mirror whatever is currently on your Incredible's current screen.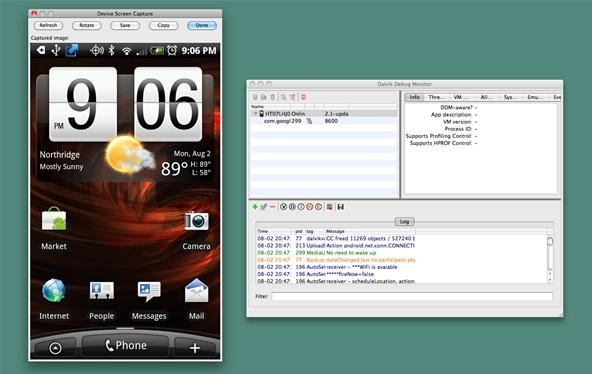
TipsMake sure you Incredible has not timed out and locked itself. Make sure it is unlocked and ready.Step 7 Take Screen Grabs of Your HTC IncredibleIn Device Screen Capture, at the top, you have 5 buttons:1. Refresh — On your Incredible, navigate to the screen you want to grab, then press this button to display it. Each time you change screens on your Android phone, you will need to press this to update the image on your computer.2. Rotate — This button will rotate your current screenshot 90-degrees counterclockwise.3. Save — To save your currently displayed screenshot, press this button. The Save image box will appear. Choose your save location and your screenshot's name and press Save. You can only save screenshots in PNG format.4. Copy — This option simply copies the screenshot to your computer's clipboard.5. Done — This closes the Device Screen Capture window.Step 8 RepeatTo take more screenshots of your Android phone, simply navigate to your desired screen on the phone and use the buttons in Step 7 above to Refresh and Save or Copy. That's it!Step 9 Clean Up Your MessNow that you have all your screen grabs saved, it's time to close everything and disconnect your Android device.Press Done in the Device Screen Capture window, Quit DDMS, Quit Terminal, and disconnect your HTC Incredible (or other Android device) from your computer.
WarningsIf you're in Disk drive mode, make sure you properly Eject your disks (probably 2 of them) before disconnecting the USB cable.That's it! It was that easy. To me, a newbie with smartphones and Android, I found these steps really easy. I was almost embarrassed that I was worried about doing this, because it was SO EASY!
TipsThis is different that "rooting" your Droid, so your warranty should remain intact. You're not modifying your phone directly, just gaining access to it via Google's developer tools.SOURCES: Simple Help, Android Developer, Flickr
How to calibrate the battery on your Android phone or tablet The Android operating system has a feature called Battery Stats, which keeps track of battery capacity, when it is full or empty
How to generate a Battery Report in Windows 10
The iPhoneHackers shows viewers how they can install Installous on their iPhone and Download free applications. First, you will need to have a Jailbroken iPhone or iPod Touch with Cydia. Your first step, will be to load Cydia on your iPhone. When Cydia has loaded click on 'Manage' and then 'Source
How to Install Installous 4 - YouTube
The march towards mainstream adoption of eSIM technology got a massive boost with the arrival of the iPhone XS, XS Max, and XR. We're now one step closer to ditching physical SIM cards altogether. If you're on the fence about this new technology, you may be surprised by the benefits it brings to the
Everything You Need to Know About the iPhone XS Max
Incognito Mode is a privacy feature that was popularized by Google Chrome, and it recently made its way to GBoard. Now it's coming to the YouTube app to help make your video watching experience truly private. While Google initially rolled the feature out slowly, Incognito Mode is now dropping in a
Open links in private browsing (incognito) window
How To: Get "Anywhere" Gesture Support, Themes, Call Counts, & More with Blinq for Android How To: Enable Google Now Integration in Action Launcher How To: Get the Nextbit Robin's Launcher on Any Android
How to Revert Back to the Default Sense Launcher or Switch to
Attacks on jailbroken iPhone with SSH installed with default password are increasing. So, we strongly recommend you to change your default root password used to SSH into iPhone before proceeding further. Follow the link below to change your SSH root password to Protect your iPhone/iPod Touch from intruders: Change Root Password to Secure Your
How To SSH Into Iphone/Ipod touch (No WiFi) - YouTube
iOS. News: Apple Releases iOS 12.3 Public Beta 4 for iPhone to Software Testers. gadgethacks.com - Jake Peterson. So far, the iOS 12.3 public betas have been on the heels of the developer betas by just over a day each time, but not anymore.
iOS 12.4 Beta 2 Released for Testing - osxdaily.com
osxdaily.com/2019/05/20/ios-12-4-beta-2-released-for-testing/
Apple has issued the second beta version of iOS 12.4 to users enrolled in the iPhone and iPad beta testing programs. Both developer beta and public beta builds are available. iOS 12.4 beta 2 is available now via the Software Update mechanism for any eligible iPhone or iPad. It's not entirely clear
iOS 13: release date, beta and feature list that will change
Samsung Galaxy Amp 2 vs LG Fortune - specs comparison
Hey there! Its Teja Here! Glad to release this video on Independence Day! Jai Hind! In this video, I will be teaching you how to make your Profile Picture a looping video on Facebook that is, how
Your Profile Picture and Cover Photo | Facebook Help Center
If you are looking to add a picture file or logo to your Gmail signature without using any third-party service or application, there is a very simple process to do so. This tutorial will walk you through how to add an image to your signature, so that everybody can see it. Insert an Image or Logo to
How to add an image to your Gmail signature - New Tricks
Use Google Drive files offline - Computer - Google Drive Help
This video will show you how to stop flash auto play in Chrome and Firefox Browser. Flash auto play consumes unnecessary bandwidth and slow down speed also. Now with the help of this video you could stop this auto Play feature in Chrome and Firefox browser.
How to Disable Video Autoplay in Chrome and Firefox
The first step is to find the menu. To find the Android Quick Settings menu, just drag your finger from the top of your screen downward. If your phone is unlocked, you'll see an abbreviated menu (the screen to the left) that you can either use as-is or drag down to see an expanded quick settings tray (the screen to the right) for more options.
Android Basics: How to Use the Share Menu - Gadget Hacks
0 comments:
Post a Comment