How To: Root Your Nexus 7 Tablet Running Android 4.4 KitKat (Windows Guide)
Whether you have the original Nexus 7, or the 2013 Nexus 7 tablet, rooting it will give you access to tomorrow's features, today.Sure, without root there's lots you can use it for. It's helped me get out of bed, became my own personal bartender, and a lot more.But with a rooted Nexus 7, you can install and use special features like KitKat's immersive mode, add extra swipe gestures, set separate home and lock screen wallpapers, and other cool Xposed Framework mods to personalize and automate your life.Rooting may sound like a tricky procedure, but it's really not. Thanks to an awesome root-kit made specifically for all Nexus devices (including both the 2012 and 2013 Nexus 7), the process for rooting is virtually painless.Update: There's a new root method available, and it's the easiest one yet. No need for USB cables, computers, drivers, or toolkits. Simply download an app, run it, and you're root 30 seconds later. Check out our guide here, it's worked flawlessly with 2013 Nexus 7's, but currently doesn't work for 2012 editions as well. Worst comes to worst, you can always come back to this guide, as that process does not erase any data. Please enable JavaScript to watch this video.
Before you begin, make sure you're on the latest version of Android, KitKat (version 4.4.X)—head to Settings -> About tablet -> System updates -> and hit Check now. If you're still on Jelly Bean, you may want to check out our previous rooting 4.3 guide for Windows, though the process is almost the same.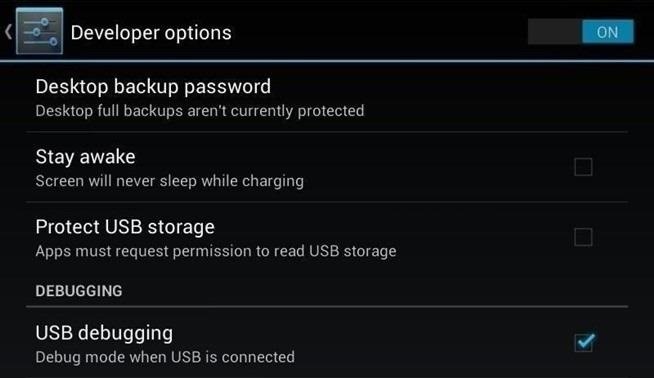
Step 1: Enable USB DebuggingYou need to allow the toolkit to make a connection to your Nexus, so you'll need to enable USB Debugging. Simply go into Settings -> Developer Options -> USB Debugging. If you don't see Developer Options, don't worry. Go into Settings -> About Device and tap on Build Number about 7 times. You'll see a toast notification pop up letting you know that you're a developer. Then simply go back and you'll see "Developer options."
Step 2: Download & Install the WugFresh Nexus ToolkitIf you don't know, this kit is a Godsend—it literally does all of the heavy lifting for us. Head over to the WugFresh website and grab the latest version of the Nexus Root ToolKit, which has been updated with KitKat 4.4.2. compatibility. You can also grab the direct download here. Whenever you run the app, make sure to right-click on the icon and select "Run as administrator".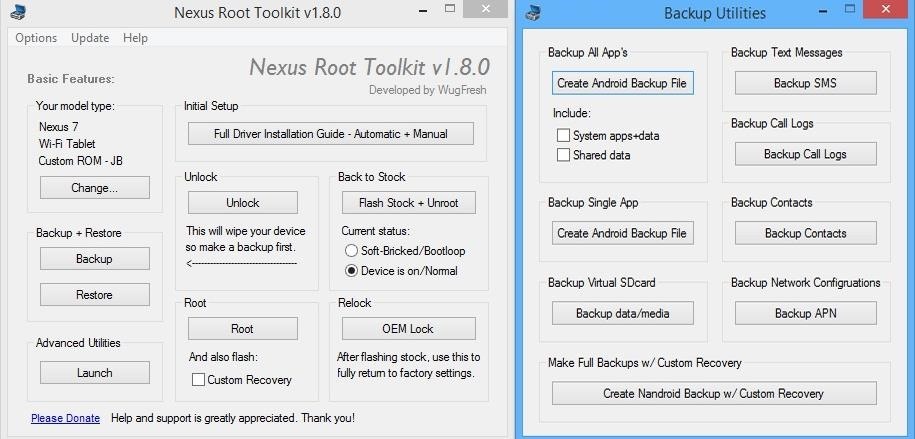
Step 3: Back Up Your NexusThe first step to rooting is unlocking the bootloader, which I'll get into a little later. Unfortunately, that process means that you'll need to wipe the data on your device. If you're not interested in starting fresh, the WugFresh toolkit has you covered. Select "Backup" from the left-most panel, then select the items you want to back up. In general, I only backup SMS and call logs because apps and contacts are restored once you sign in with your Google account.Unfortunately, app data is not restored automatically, so if you've got a great high score in Flappy Birds that you'd be sad to lose, you may want to back up your apps using the toolkit. Just select "Create Android Backup File," either under "Backup All Apps" or "Backup Single App." Alternatively, you can back up your Nexus 7 without root or a custom recovery using various other backup tools.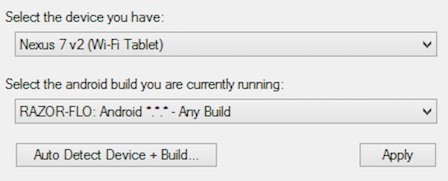
Step 4: Set Up the ToolkitWhen you initially launch the toolkit, you'll need to provide some basic information. Choose the specific Nexus device and build you have. If you're not sure what you input here, just select Auto Detect Device + Build. Next, you'll need to install the proper drivers for your device, if you didn't already do so through the backup process. All you do is select Full Driver Installation Guide and follow the simple instructions. After going through the driver installation, Unlock your device to make rooting possible. Unlocking will wipe the device.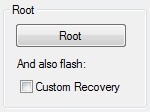
Step 5: Root Your Nexus 7Finally, you're ready to root. Check the Custom Recovery option to also apply TWRP custom recovery to your device, then click Root to initiate the process. With the custom recovery, you will have an extra step that includes tapping your screen a few times, but it's easy to follow with WugFresh. After the program runs its course, your device will be unlocked and rooted and will reboot.
Step 6: Make Sure You're RootedAn easy way to make sure the WugFresh toolkit worked and your Nexus 7 is rooted is to download the free Root Checker app from Google Play. Just open the app, select Verify Root, and wait for the results.
Unleashing WugFresh's Full PotentialNow that you've set up WugFresh with your device and are unlocked and rooted, let's quickly check out what else you can do with the toolkit. In the "Advanced Utilities" menu, you can take screenshots of your device, flash .zips without using a custom recovery, restore stock kernel and recovery, install apps (APKs), and much, much more.On the toolkit's main screen, you can also return your device to its original condition, removing root and re-locking the device. With WugFresh, the rooting process is extremely easy on Nexus devices. If you ran into any issues, just comment below and we'll help you out. And check out all of the Nexus7 softModder guides to start applying root-only mods to your device.
Cover image courtesy of Ministry127
Windows firewall blocked apps on windows 10 Original title:Windows 10 Firewall Every time I boot up my computer I get pop up from Windows Firewall that some features have been blocked for the same apps: Chrome, Steam, and any steam game that I boot up.
How to Monitor Your Kid's App Usage on Android « Nexus
How Can I Improve My Web Site Code for SEO? Bad code can contribute to the majority of performance problems. Writing tight HTML, JavaScript, and CSS code will speed up a web site. What are ways to write tight code? Actually, it is pretty easy. Here are a few. Pure CSS Design
How to Speed up Website (WordPress) without Changing Web Host
How to enable JavaScript in your browser Nowadays almost all web pages contain JavaScript, a scripting programming language that runs on visitor's web browser. It makes web pages functional for specific purposes and if disabled for some reason, the content or the functionality of the web page can be limited or unavailable.
How to Make Trippy EL Wire Headphones That Dance to the Beat of Your Music: How to Make Yourself the Star of PSY's Gangnam Style Music Video: Jet Set Radio Review (iOS, Android) Arcane Legends Review (iPhone, iPad, Android) How Amazon Followed Google Into the World of Secret Servers: Miscellaneous Thoughts And Observations On iTunes 11
3D Surround Sound Mix【Put on headphone feel the - YouTube
How to use offline mode in Google Maps with your iPhone or iPad. By Roger Fingas Monday, January 23, 2017, 10:11 am PT (01:11 pm ET) One of the continuing advantages of Google Maps over Apple's
Google Maps May Get Whole Country Offline Map Downloads
How To Hack An iPhone Free Without Jailbreak 2019 [iPhone hacks & tricks] If you are reading this, you maybe an owner of Apple iPhone and you are tired of the annoying restrictions the phone has. We will guide you through best cool iPhone hacks & tricks, secrets codes, for all different iPhone 6, 6s, 7, 8, X!
How-to Get Free Ringtones (No Jailbreaking Required)
Is there any way to change the phone's language on a per-application basis? This would presumably require root access, which I have available. Basically, I'm looking for a root app which will chance the Unix locale for selected apps, or something like that. I want to make Google Now work without changing every other application to English
App Locale | Xposed Module Repository
And on Instagram, you can repost, which is essentially a way to share a picture from another Instagram user with your followers. To repost on Instagram means to re-share someone else's Instagram stories or content to your business or private account. Reposting Instagram stories is a great way to fill your feed with beautiful content.
How To Share A Friend's Instagram Story In Your Own
How To: 9 Alternative Uses for Your Android's Volume Keys How To: Protect Apps with a Secret Volume Button Code on Android How To: Change the App Launched with the Shortcut Key on LG Devices How To: Make the Volume Buttons on Your Galaxy Note 9 Control Media Volume by Default
Android Volume Button Secret Tricks - YouTube
I would not say hidden features as most are well known to a hyper-v user but this is a good summary of it more advanced features. One great side feature (not hyper-v per se) is the ability to mount Macrium Reflect image backups as a hyper-v vm using Macrium Viboot. You can run vm, modify it eg add new programs and save as new image backup.
10 hidden Hyper-V features you should know about! - Microsoft
File Transfer via Webmin. Enter the URL in the web browser i.e
Tin Can Table Lantern Planning a barbecue or an al fresco dinner party? These recycled tin can lanterns are an easy way to add some sparkle without stretching your decorating budget. The…
Use an Altoids Sours Tin to Create a Mini BBQ Grill
How To: Android's Built-In Scanner Only Catches 15% of Malicious Apps—Protect Yourself with One of These Better Alternatives How To: Keep Facebook from Tracking Your Location When You're Not Using the App How To: Prevent Friends from Sharing Your Instagram Stories as Direct Messages
Hide Your Call & Message History for Specific Phone Numbers
Android's Quick Settings menu is quite handy—just swipe down with two fingers from the top of your screen and you're ready to toggle several different system settings on or off. It got even better with Android 6.0 Marshmallow, since you can even use the hidden System UI Tuner to rearrange and remove your Quick Settings tiles now.
How to use and customize Galaxy S10 lock screen?
Since Facebook provides a virtual list named "Other Friends", you can even hide your status from friends that didn't make it on any of your lists. Done! Now, you seem to be offline for all of your friends, even after you log out and in again, even though your status is displayed as "online" (green circle in the chat window).
Hide or Deactivate Online Status for Facebook Messenger on
0 comments:
Post a Comment