How To: Install TWRP Recovery on the Essential PH-1
For modders, there are few tools more important than TWRP. TeamWin's custom recovery makes flashing mods like Magisk, Xposed, and custom ROMs incredibly easy, and it lets you root your phone at the press of a button. On top of that, it can make complete backups of your phone in case you mess up. That's why, for Essential users, this should be the first mod you add.The process is a bit more complicated on the Essential PH-1 because of seamless updates. The dual partitions make flashing TWRP a bit more complex than it was on previous phones. However, thanks to Essential's friendly policy towards modders, the process isn't too difficult, and with our guide, you'll have this indispensable tool on your phone in no time.
What You'll NeedWindows, Mac, or Linux computer ADB and Fastboot installed USB data cable
Step 1: Unlock Your BootloaderBefore you can flash any custom firmware on your Essential PH-1, you will need to unlock your bootloader. This is as simple as enabling "OEM Unlocking" in Developer Options, then sending two Fastboot commands while your phone is in bootloader mode (fastboot flashing unlock_critical then fastboot flashing unlock). For an in-depth tutorial, check the link below.More Info: How to Unlock the Bootloader on Your Essential PH-1 You will see a screen like this when you boot up the phone when your bootloader is unlocked. Image by Jon Knight/Gadget Hacks
Step 2: Download the TWRP FilesBecause Essential PH-1 supports Seamless Updates (A/B partitions), you will need to download two files to install TWRP: a ZIP and an IMG. First, download the ZIP file from your phone using the link below.Download the TWRP ZIP file Next, you'll need to download the IMG file to your computer. Click the link below from your desktop or laptop to download it.Download the TWRP IMG file Next, to simplify things, you'll have to move the IMG file to the platform-tools folder inside of your ADB and Fastboot installation directory. For Windows users who followed Method 1 in our ADB installation guide, this can be found at C:\Program Files (x86)\Android\android-sdk\platform-tools.If you used another ADB installation method on Windows, or if you're using Linux or Mac, you'll have to find your platform-tools folder by searching your computer's hard drive. Once you've found it, move the TWRP IMG file from your download folder into the platform-tools folder.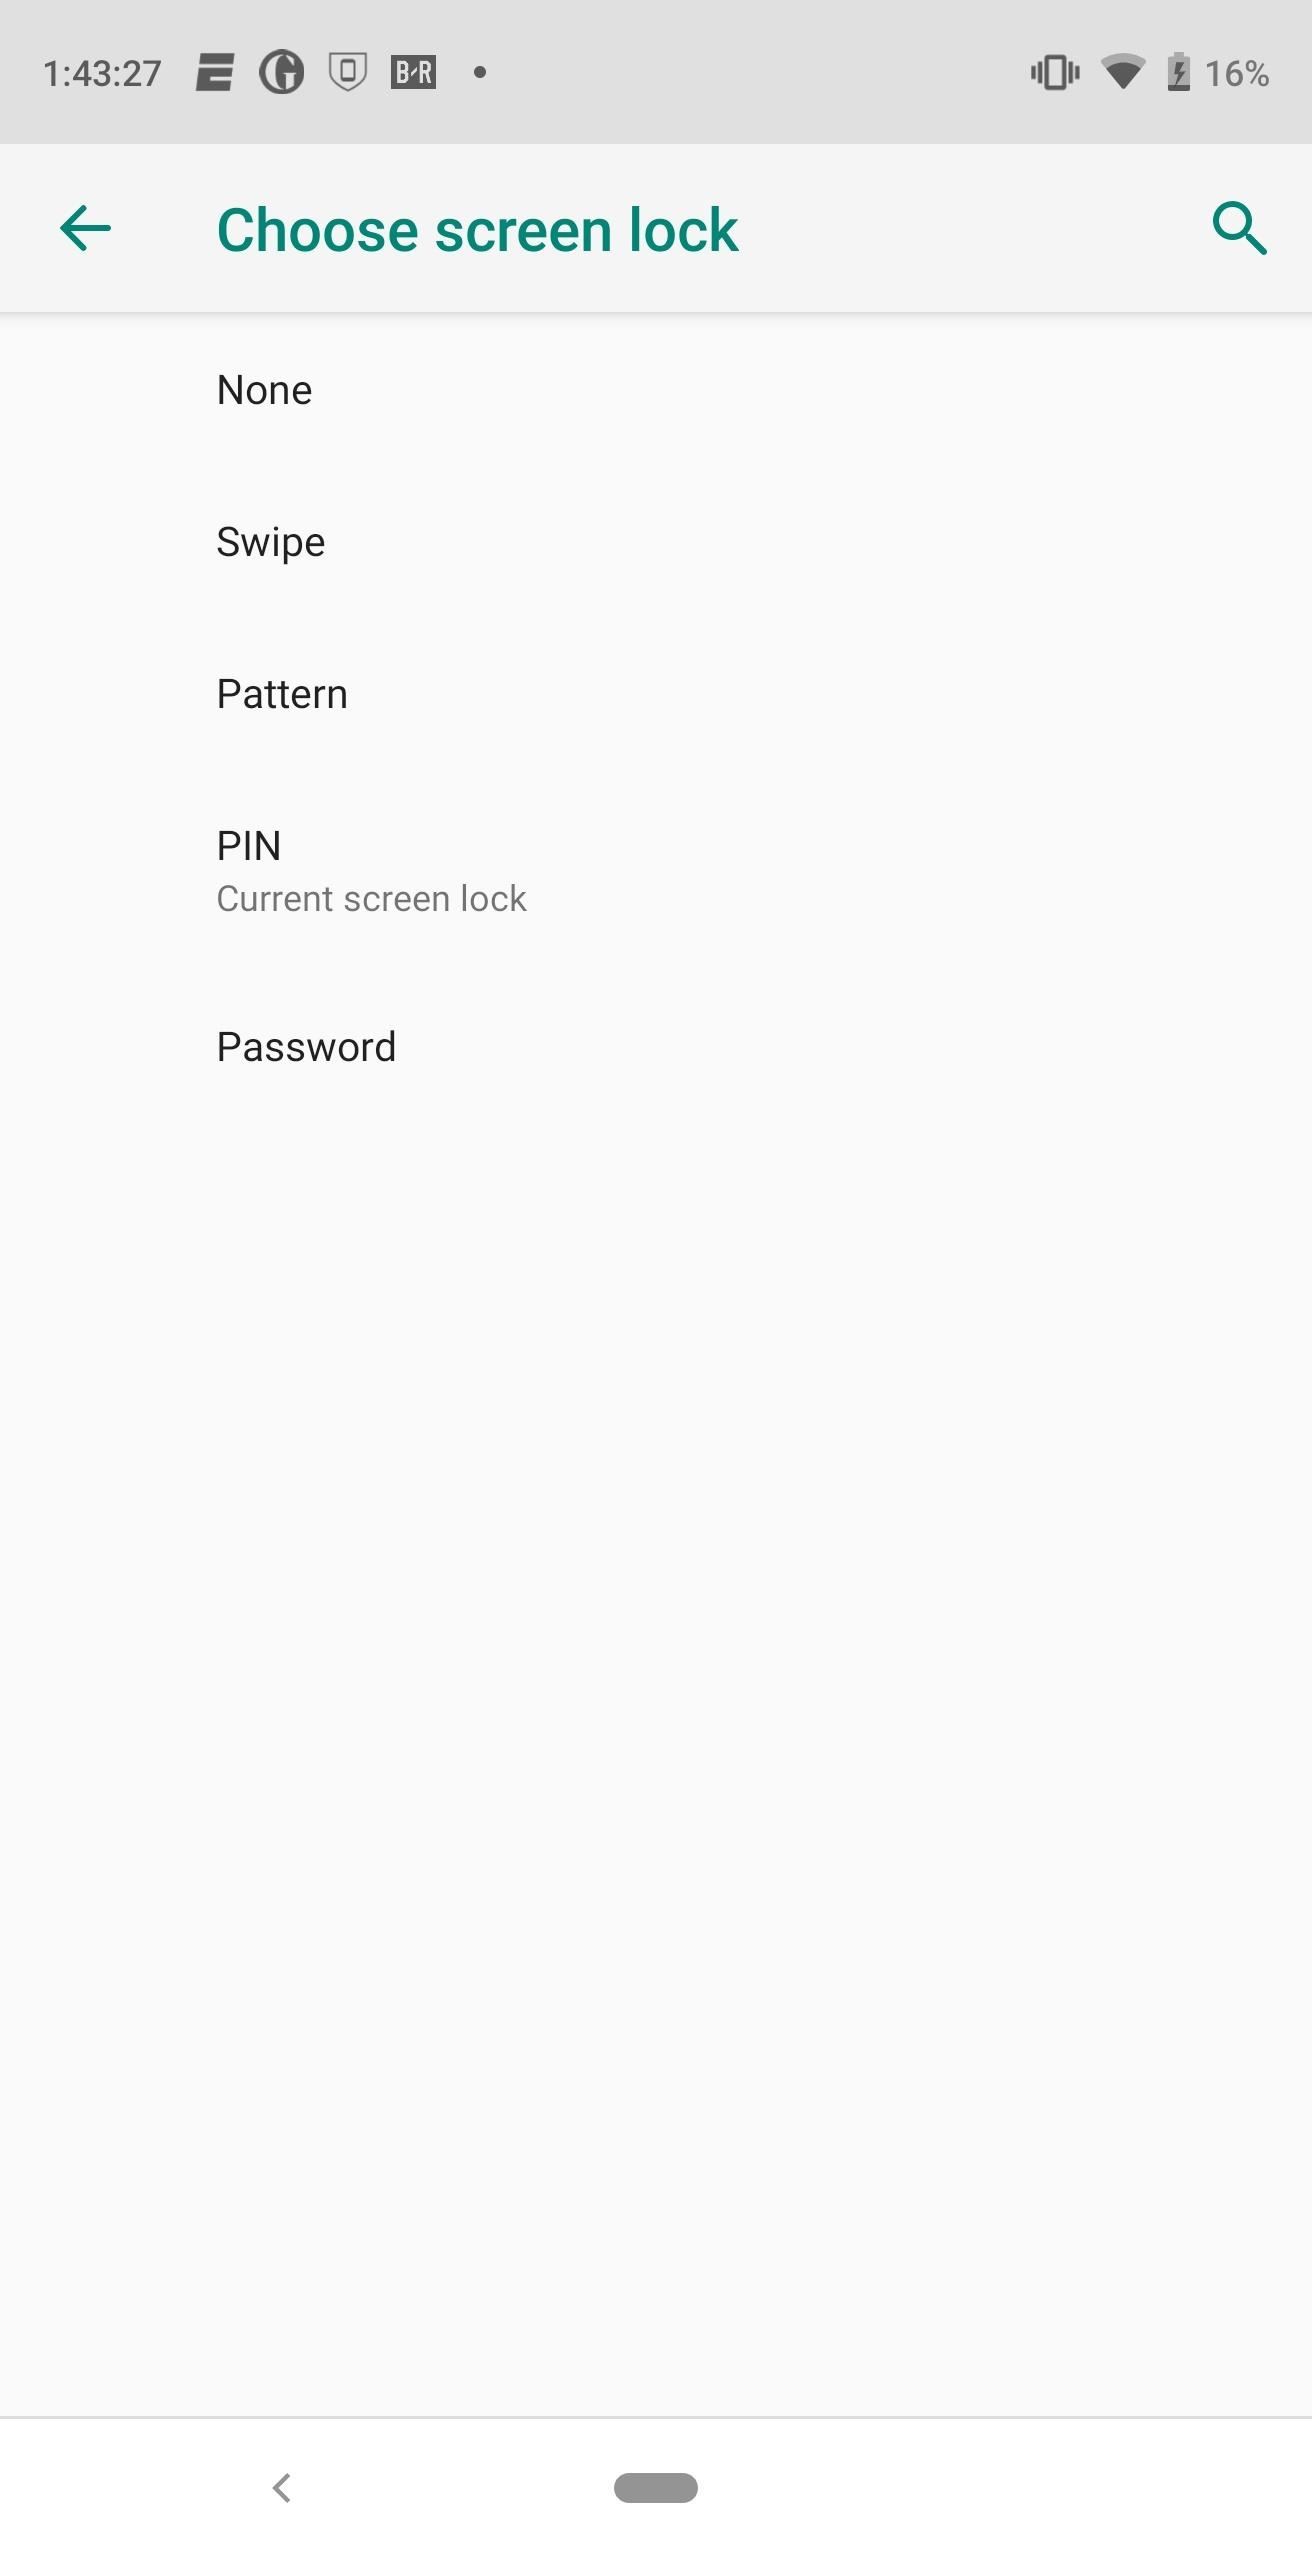
Step 3: Switch to a PIN or PasswordThis version of TWRP can decrypt your phone's storage partition, but it will need your passcode to do so. Because gestures are harder to input with the provided keyboard, we suggest sticking with a PIN or password.To switch to either a PIN or password, open Settings and choose "Security & location." Select "Screen lock" and, after inputting your current passcode, choose either PIN or password.
Step 4: Reboot to the BootloaderNow, connect your phone to your computer with the USB cable. On your computer, open up the command prompt (Windows) or terminal (macOS and Linux). If you're on Windows, you can do this by pressing the Windows button on your keyboard, then typing "cmd" and hitting enter. If you're on Mac or Linux, simply open the "Terminal" app from your Applications folder.With the command window open, you'll now need to change directories to the platform-tools folder. This can be done by typing "cd <location>," where <location> represents the full location of your platform-tools folder. However, if you'd like more help, check out the guide at the link below for a full walkthrough on how to accomplish this.More Info: How to Change Directories to the Platform-Tools Folder Now, enter the following command into the command prompt or terminal: adb reboot bootloader After roughly 10 seconds, your phone should boot into bootloader mode. You should see a screen like the one below, which indicates you can now input Fastboot commands. Image by Jon Knight/Gadget Hacks
Step 5: Verify the Fastboot ConnectionFirst, make sure your Fastboot connection is working by inputting the following command: fastboot devices Note: Linux, Mac, and Windows PowerShell users will likely have to add a period and a slash (./) to the front of all commands listed here, e.g., ./fastboot devices)If you see a series of numbers and letters and the word "fastboot," your connection works and you can continue If not, check your ADB and Fastboot installation and double check your USB cable. I would also recommend switching USB ports on your computer (or even switching computers), as sometimes this will fix any problems.
Step 6: Find Your Current Boot SlotOnce you've established a connection, input the following command: fastboot getvar current-slot Note: Linux, Mac, and Windows PowerShell users may have to type ./fastboot getvar current-slot here.This will reveal the current boot slot your phone using. You may get a FAILED response. If you do, reenter the code and try again until the current slot is revealed. The slot will either be "A" or "B," but take note of which, as you'll need this information later.
Step 7: Flash TWRP Image FileNow you're ready to flash the base TWRP image file. The tricky part here is you want to flash TWRP to the inactive partition. In other words, the opposite of the value you received in Step 6 above.So if your active boot slot was "A," enter the following command to flash the TWRP image to slot B: fastboot flash boot_b twrp-3.2.3-0-mata.img If your active boot slot was "B," on the other hand, enter this command to flash TWRP to slot A: fastboot flash boot_a twrp-3.2.3-0-mata.img Afterward, you'll need to set the slot that you just flashed TWRP to as the active boot slot. To do so, copy the following command, but don't hit enter yet. fastboot --set-active=slot Now, replace the word "slot" in the above command with the slot where you flashed TWRP. For example, if your active slot was originally "A" and you flashed TWRP to the "B" slot using the first command above, you would enter fastboot -- set-active=b to make the "B" slot active. After adjusting this, hit enter to send the command. When done correctly, it should look similar to the screenshot below.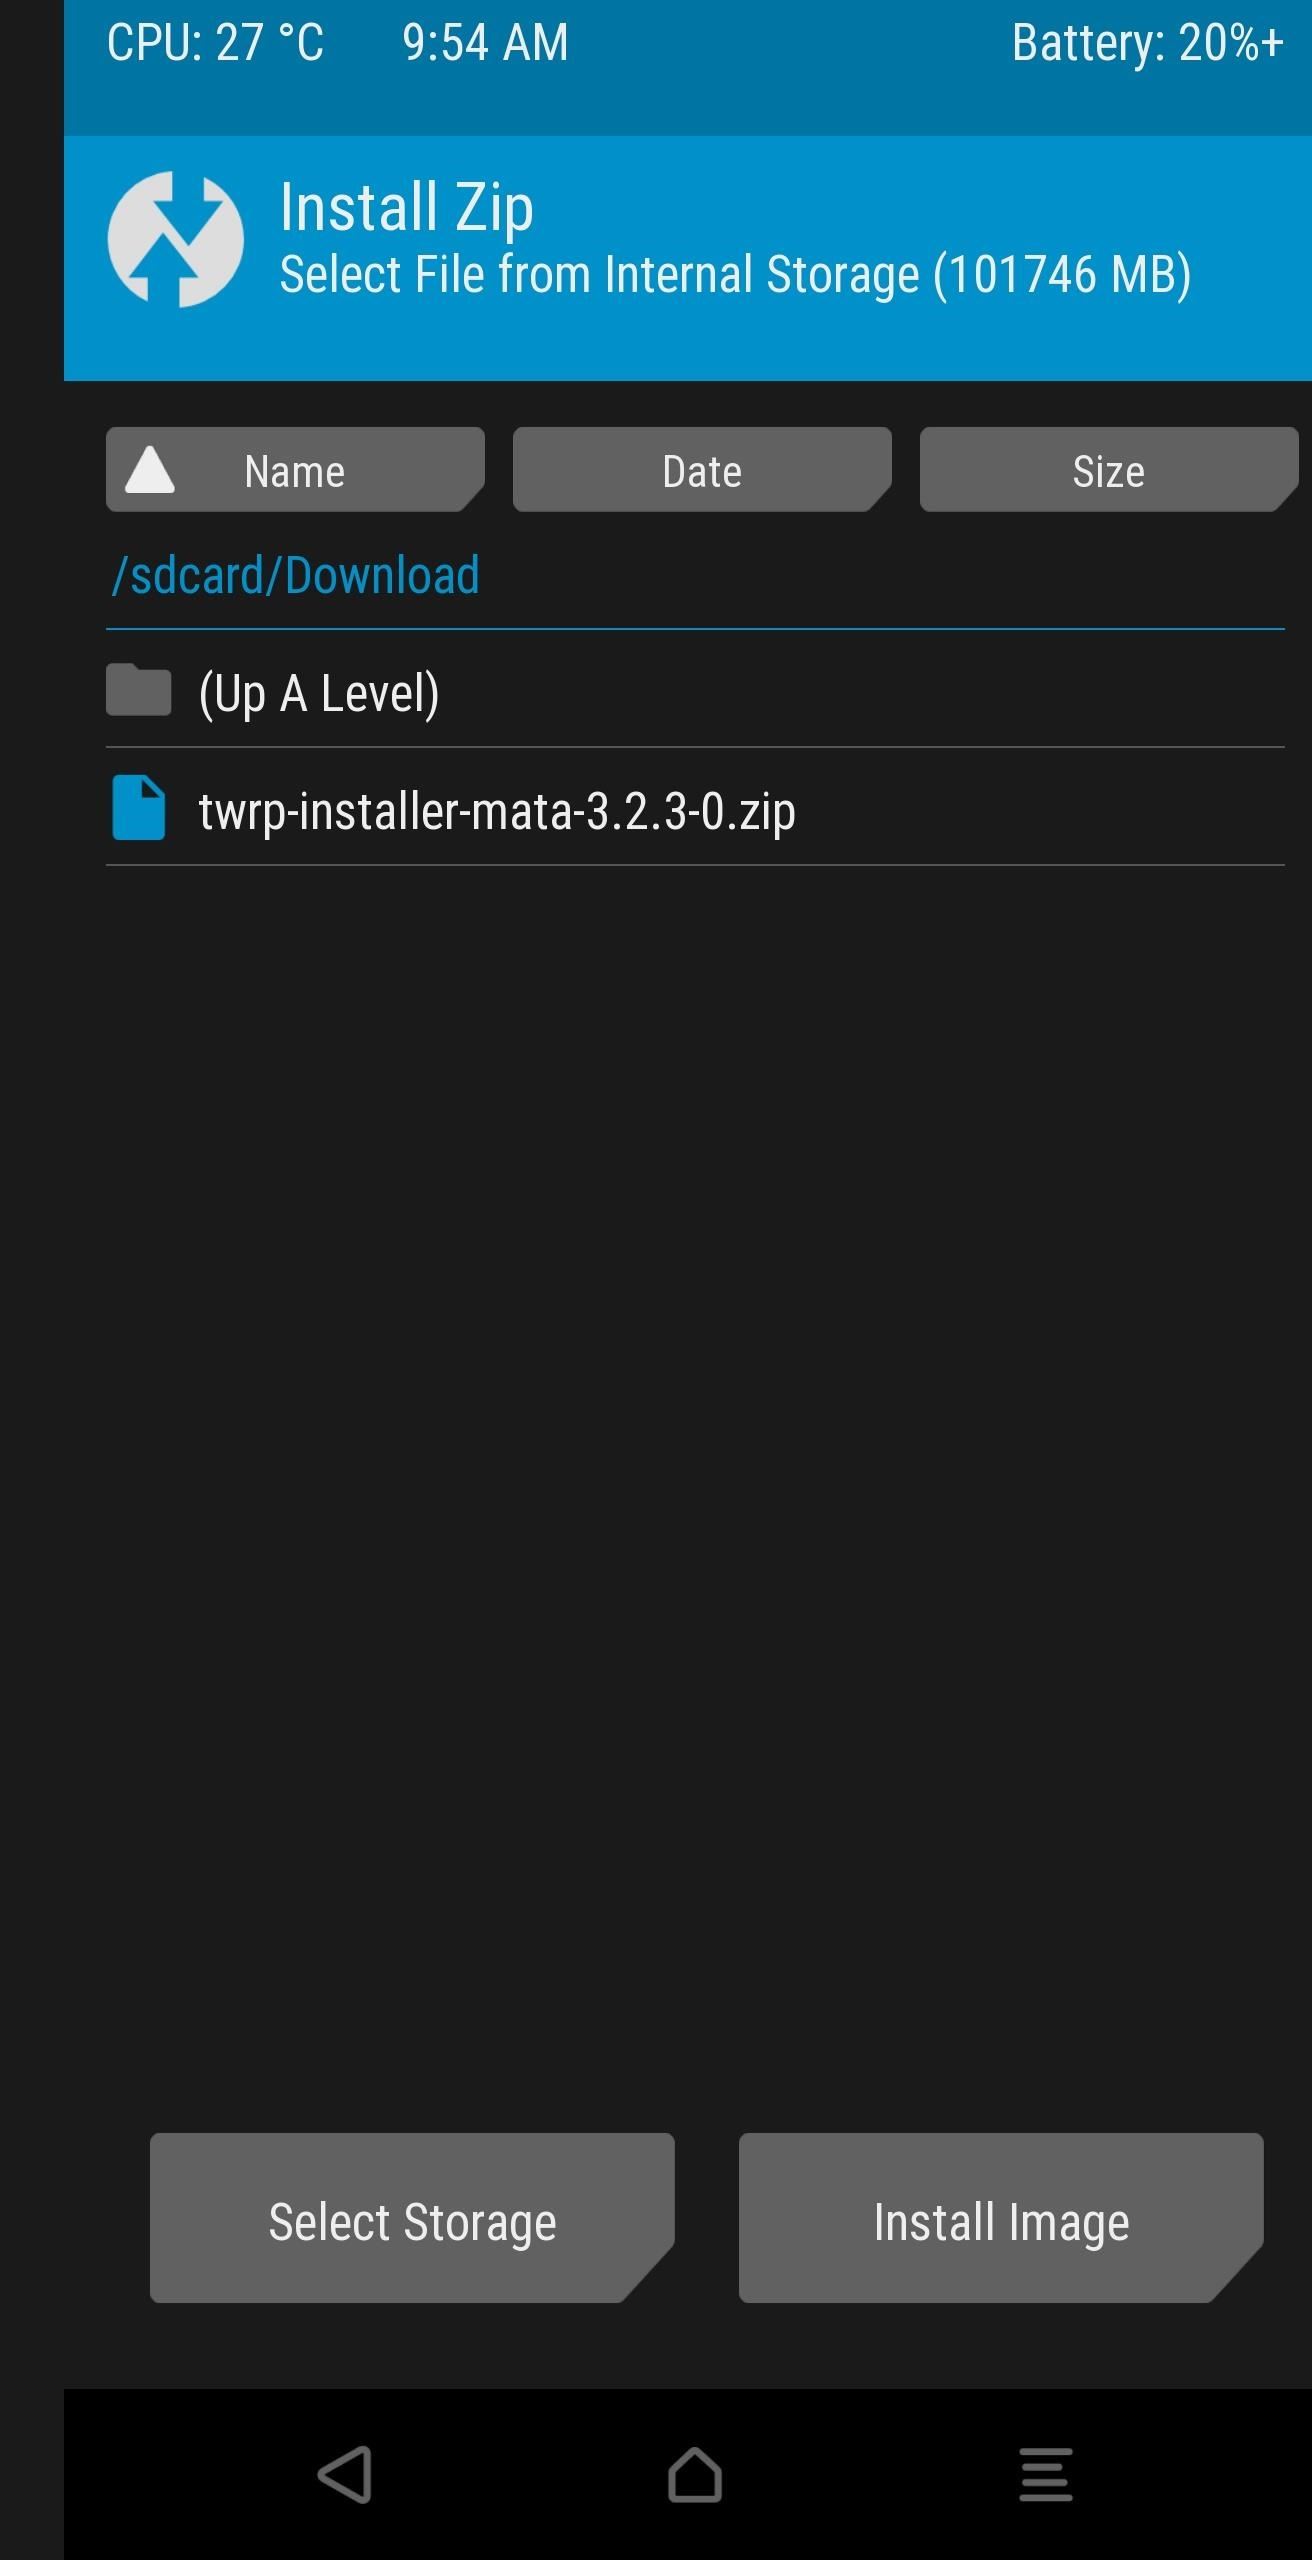
Step 8: Install the TWRP ZIP FileNow that you have the TWRP image file installed on one slot, you'll need to use the ZIP file to install TWRP on both slots. With your phone still on the bootloader screen, use your volume buttons to highlight the "Recovery Mode" option, then press your power key to select it. This will boot your phone into TWRP.Input your password or PIN and select the checkmark in the bottom-right corner to decrypt your storage and let TWRP access files on your hard drive. You will more than likely find you are unable to use the touch screen. This is because this IMG file was designed for the August security patch firmware. Therefore, the only way to input your PIN or password will be to connect a USB OTG mouse and control the cursor to select the buttons on the keyboard. However, if you don't have an OTG cable or mouse, jump to the last step for a workaround.Once you make it to the main menu, choose "Install" and select "Download" from the list of folders. Select the TWRP ZIP file you downloaded in Step 2, and with both checkboxes left blank, swipe the blue toggle to the right to confirm. Once completed, select back until you return to the TWRP's main screen. Choose "Reboot" to enter a submenu. Along the bottom should be the text "Current Slot: X" with X representing whichever slot you are on now. Since you are in currently in the slot opposite of the operating system, you'll want to reboot to the other one now that TWRP is installed on both slots.Reboot to the slot you were originally on (the opposite of the slot you are currently on) using the corresponding button. Your phone will reboot and return you to the Android lock screen.
Install TWRP Without a USB OTG MouseIf you are running into the issue of not being to use the touch screen to enter your password or PIN after flashing the IMG file and you don't have a USB OTG mouse, you will need to keep your phone connected to your computer after flashing the IMG and input the following commands one by one once you reach the prompt for the password or PIN from TWRP (remember, Mac and Linux users need to input "./" before "adb"): adb shell twrp sideload
adb sideload twrp-installer-mata-3.2.3-0.zip Once installed, return to the bootloader by using the following command: adb reboot bootloader From here, return to TWRP and switch to the active slot using the instructions in Step 8, and the touch screen will work.And that's it. With TWRP installed on both slots, you can take advantage of additional features offered by the custom recovery. You also now have a decision to make. Do you root with Magisk or another tool like SuperSU? Do you keep the stock ROM or use a custom ROM? The choice is yours.Don't Miss: The Ultimate Guide to Using TWRP: The Only Custom Recovery You'll Ever NeedFollow Gadget Hacks on Pinterest, Twitter, YouTube, and Flipboard Sign up for Gadget Hacks' daily newsletter or weekly Android and iOS updates Follow WonderHowTo on Facebook, Twitter, Pinterest, and Flipboard
Cover image and screenshots by Jon Knight/Gadget Hacks
Step 2: Scan QR Codes from the Lock Screen. With the "Scan QR Code" button now available in your iPhone's Control Center, you're free to instantly scan items that catch your interest without having to unlock your device or thinking about whether or not the Camera app does the same thing.
How to Build Qr Code Generator Application Using MS Visual
You can play around with VSCO Cam's editing settings and create your own set of presets. 50 VSCO Cam Filter Settings. In this post, we have collected 50 such filter settings you can try on your photos. Don't be afraid to experiment, then let us know what you love.
10 best VSCO Instagram filters to enhance your feed
Yup some cell phones can do all of that and more. In this tutoral though, you'll find out more about a basic, easy to use system that has been around for some time. The speed dial. If you'd like to have speed dial numbers on your Android phone it's quick and easy. These are shortcuts that make it easy to call the people you talk to most. Enjoy!
How To Create a Speed dial Contact on Android 6 0
Enter the cell phone number in the To: box using the format number@cellphonecarrier.com, where "number" is the phone number of the cell phone to which you're sending the message, and "cellphonecarrier" is the domain name that allows recipients to receive e-mail text messages. For instance, to send a text message to cell phone 123-456-7890
How to Send a Text Message to Your Email - wikiHow
The newest update for iPad, iPhone, and iPod touch is near, and I've got a firsthand look of what's to come in the new iOS 7.1, the first major update since iOS 7 was released.
All the Cool New Features in iOS 10.3 for iPad, iPhone & iPod
Rechargeable Wireless Gaming Mouse, Bluetooth USB Computer Mouse, 2.4G LED Color Changing Optical Silent, Auto Sleeping, Ergonomics Grip, 4 Adjustable DPI, Compatible with Laptop/PC/Notebook (Black 4.3 out of 5 stars 146
How To Change The Zelotes 5500 DPI Gaming Mouse - YouTube
How to Track Firewall Activity with the Windows Firewall Log Rahul Saigal @rahulsaigal30 Updated July 11, 2017, 9:14pm EDT In the process of filtering Internet traffic, all firewalls have some type of logging feature that documents how the firewall handled various types of traffic.
A ndroid is a smart device that has lots of excellent features in it and one of the highly valuable features that we are going to discuss right here is the process by which you can use your Android device as a system mic in Windows PC.
How to Use Android as Microphone on PC - Technology Hint
Do you already have a home stereo system? Now you can play your music from your iPhone, iPad, iPod Touch, Mac or PC and have it play WIRELESSLY onto that sou
3 Ways to Connect Your iPhone to Your TV - wikiHow
How to Get Adobe Flash Player on Samsung Galaxy S4 If Adobe Flash Player does not work Try Installing Flash Fo
How to Install Adobe Flash Player on a Samsung Galaxy S4 to
How To: Jailbreak iOS 7.1 Versions on Your iPad, iPhone, or iPod Touch How To: Jailbreak an Apple iPhone 4 or other iOS 4.1 device with limera1n How To: Use Split View Mode on Any iPad Model How To: Display your iPod Touch, iPhone, or iPad screen on your computer
Learn How to Monitor Data Usage Of Apps On Android and Block Apps with High Usage. Learn How to Monitor Data Usage Of Apps On Android and Block Apps with High Usage. to block your 3G data all
How to Block Apps on Your Child's Android - screentimelabs.com
0 comments:
Post a Comment